Tip #1: Joe Mama!

Most people in Blockate have probably had the necessity to make a diagonal block-formation, and most people do it by just having inter-changing wedges. This way of building looks bad, since compared to normal sized blocks it looks very thin.
One of the ways to fix this is by putting slabs and tiny-wedges for every other area in the diagonal building. As you can see in the image, the first building is how most people do it, and as you can see the second way looks way better. The third way shows how the second formation was built.
Tip #2: Tracks :D
Everybody loves to make marble-tracks, they're really cool. What's even cooler is having one that doesn't make you fall off when you ride it. Here are some tips for making tracks and turns.


Another important feature in any good marble track is turning! Now, with turning you should acknowledge the fact that diagonal-track should be built like what you were taught in Tip #1. Check out the pictures for more info.
.
Tip #3: Ghost Blocks
This feature allows you to hide transparent blocks behind glass blocks, effectively creating "Ghosts" and also allows you to make puzzles.
This is possible by putting a block with any transparency at all (0.1, 0.2, whatever) and then putting a transparent glass block in front of it. Whenever you look through the glass block, you will see absolutely nothing there. Look through anything else, and it will become visible. This incredibly simple trick could be key to making a complex puzzle game or terrifying horror game.
Tip #4: Uncollidable Blocks
Ever wanted to make Traps and Secret Places? you can by using the "CanCollide" feature.
When you are in the building properties there is "CanCollide" bar in your build menu. Disable it, and now you can walk through the part.
You can also use uncollidable blocks for doors!
Tip #5: Smoother Track Curves
Everyone loves to make marble tracks, right? But why settle for that diagonal track as shown in Tip #2, when you can have smoother curves to your tracks? There are many different sizes a smooth curve can be, but here are the 3 most essential.


Short curve.
- Short Curve - Useful for when you need your ball to turn somewhere in a pinch. This curve does have some clipping around the inner right curve, which is made with 2 'PillarY' wedges. Try to use a plastic variant on this one.


Medium curve.
- Medium Curve - This curve is perfect for almost every turn you have to do. This curve does not have clipping in it, making it able to use with any material without any interruptions.

Long curve.
- Long Curve - This curve is pretty big. It is most useful for when you need to turn a pretty large amount, like around a big build you made. This curve does not have clipping in it, making it able to use with any material without any interruptions.


All of these curves are essential in your marble track if you wish to have a smooth turning experience.
Tip #6: Better Fan Designs
This tip may seem a little insignificant, but introducing fans to your creations can really help to add an industrial and functional atmosphere to your builds. Here are a few ways to create some interesting industrial fan designs.


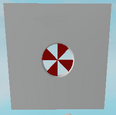
Industrial Fan 1
Image 1 shows an industrial fan made out of 4 small, Inverted Cut Cylinders which have been enclosed by a large Inverted Cylinder. You may have some difficulty finding the correct orientation for each fan blade.

Industrial Fan 2


Industrial Fan 2 Blue Full Sized Wedge for comparison
Image 2 shows a simpler fan design made of 4 small wedges that have been enclosed identically to image 1. This design is a bit simpler to construct.


.PNG)
Scaled Up Fan
Both of these designs can be scaled up using 4 inverted cut cylinders and 4 full size fan blades.
Note: The design used in images 1 and 3 were created by the fire_warrior123 It is difficult to know where the design for 'Industrial Fan 2' is from originally from because it is a somewhat basic design.
.
Tip #7: Thin grass
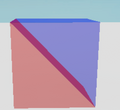
Sides: ( image 1 ) simply put two different coloured wedges, Blue would be the grass, red is dirt, The high end of the red wedge is the side the player will see.

Image 1


image 2
Corners: ( image 2 ) Put two dirt wedges facing the corner you want to cover, Then, place a grass corner wedge that is facing inward to the corner.


Final image
With this in mind, you can make grass that's only a fraction of a stud thick.
Red: Dirt wedge
Blue: Grass wedge
Green: Grass cube
Yellow: Corner wedge
Tip #8: Quadrant usage
This tip is incredibly useful, as Quadrant usage can be used to create football matches, chessboards, road lines, keyboards, the list goes on! (Please add pictures for: football match, chessboard, roadline, keyboard/computer and more.)

Computer